
Checked against OpenAI’s Help Center and launch announcement on October 31, 2026. ChatGPT changes often, so button names, limits and features may differ on your account.
The ChatGPT Photo Editor is the picture-editing side of ChatGPT Images: you upload a photo, or open one ChatGPT made, describe what should change, and a revised version appears in the same conversation. There is no separate app with that name, and the experience feels closer to briefing a retoucher than to dragging sliders. This guide explains how the ChatGPT Photo Editor works, which steps OpenAI documents, ten prompts worth copying, and the places where results can go wrong.
Table of Contents
What Is the ChatGPT Photo Editor?
The ChatGPT Photo Editor is a convenient nickname, not an official product title. OpenAI’s own name is ChatGPT Images, which its Help Center describes as a way to create new images and edit existing ones. As of this research date, the current version is ChatGPT Images 2.5, which OpenAI released on September 8, 2026, promising more precise editing and up to 50% lower latency than Images 2.0.
In plain terms, the ChatGPT Photo Editor accepts instructions written in everyday language. You say “make the sky overcast” or “remove the cyclist behind my sister,” and the tool tries to deliver exactly that while leaving the rest alone. “Tries” matters, and later sections show why.
Five Workflows People Often Confuse
Search results and social posts blur several different features together. OpenAI’s documentation treats them separately, and so should you:
| Workflow | What it means | Is it photo editing? |
|---|---|---|
| Editing an uploaded photo | You attach your own picture and describe a change | Yes |
| Generating a new image | You describe a scene from scratch | No, it creates something new |
| Understanding an image | You ask ChatGPT what a picture shows, or to read text in it | No, this is analysis |
| Targeted editing | You highlight part of an image and describe a change there | Yes |
| Reference-guided creation | You supply a photo or sketch as visual guidance for a new picture | Partly, depending on how closely the result follows the source |
OpenAI’s image-inputs FAQ is about the analysis row: it explains what ChatGPT can interpret in a picture you upload, not what it can change. Keeping that boundary clear prevents a common mistake, which is assuming that a good description of your photo means a faithful edit of it.
How the ChatGPT Photo Editor Works
OpenAI does not publish a technical walkthrough in its Help Center, so treat this section as practical framing rather than official engineering detail.
When you ask the ChatGPT Photo Editor for a change, you get back a new image, not a layered file you can reopen in a design program. The original stays visible in the conversation, and each request produces another version. One consequence is that edits are judged by looking, not by reading a settings panel. Another is that unrequested differences can sneak in: a slightly different earring, a shifted shadow, a changed shirt pattern.
OpenAI’s launch post hints at this risk. It says Images 2.5 is better at editing only what you ask while keeping other details the same, and that it follows instructions more reliably across multiple turns. That is OpenAI’s claim, and my review did not include an independent head-to-head test. A sensible habit is to compare every result with your original before you accept it.
Can ChatGPT Edit Existing Photos?
Yes. OpenAI’s Help Center says you can upload an existing image and describe the changes you want ChatGPT to make, which is the heart of the ChatGPT Photo Editor workflow. It also says you can edit an image that ChatGPT generated, which is useful when you want to keep refining your own creation.
Before you upload, check the file. OpenAI’s image-inputs FAQ lists PNG, JPEG and non-animated GIF as supported file types, with a 20 MB limit per image. The same FAQ says the number of images you can add to a conversation depends on factors such as image size, so reduce the quantity or size if uploads fail.
How to Access the ChatGPT Photo Editor
You can reach the ChatGPT Photo Editor three ways, according to OpenAI’s Help Center:
- Ask for an image or an edit inside any ChatGPT conversation.
- Select More and then Images, or open Images from the sidebar.
- Open a picture already in your conversation or in your Images library, then use its editing controls.
The ChatGPT Photo Editor is available wherever ChatGPT Images is, which OpenAI lists as web, iOS and Android. OpenAI’s Images 2.5 announcement says the update rolled out to ChatGPT, ChatGPT Work and Codex users across all tiers. “All tiers” is not the same as “same allowance,” which the limits section below addresses. For a broader tour of what the feature family includes, our ChatGPT Images guide covers generation, Sketch and templates in more depth.
Step-by-Step: How to Edit a Photo Using the ChatGPT Photo Editor
Here is the shortest reliable route through the ChatGPT Photo Editor, built from OpenAI’s documented controls plus my own workflow suggestions, which I label as such.
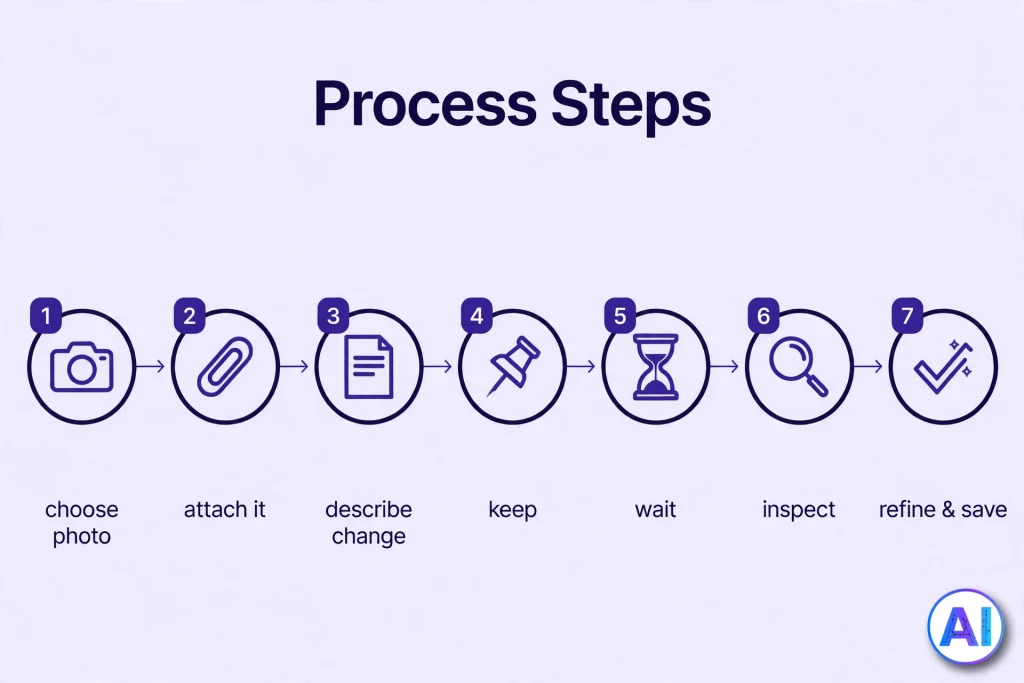
- Choose a source file. Pick the sharpest, best-lit original you have. A JPEG or PNG under 20 MB fits OpenAI’s stated upload limits.
- Open ChatGPT on web, iOS or Android and start a new conversation. Giving each photo its own conversation keeps instructions from colliding.
- Attach the photo. OpenAI’s FAQ describes using the plus icon and choosing Add photos & files; dragging an image into the message box or pasting one also works.
- Describe the edit and the boundary. Say what to change and what must stay put. The next subsection shows how.
- Wait and inspect. OpenAI notes generation can take a few minutes, and you can keep using ChatGPT while it works. Zoom in on faces, edges and small objects.
- Refine one thing at a time. Ask for the next change in the same conversation, or open the editor to highlight a region.
- Save the result. Use Save from the image controls to download it. OpenAI also says images you create are stored under Images.
How to Upload a Photo and Describe the Changes
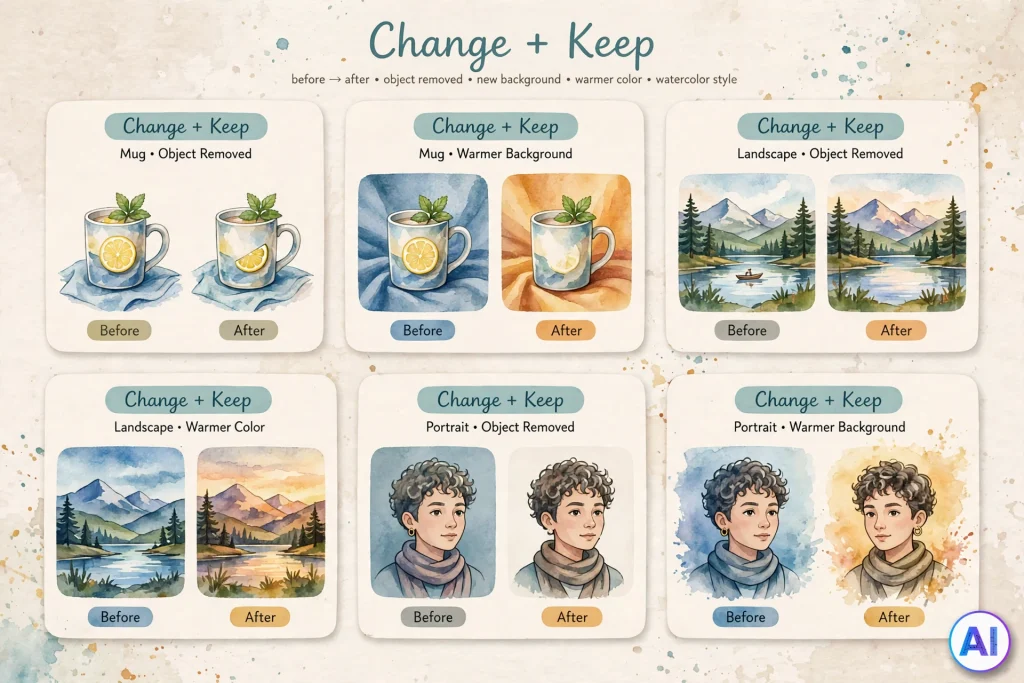
The most useful sentence structure I can recommend, and it is an editorial suggestion rather than an OpenAI formula, has two halves: a change and a keep. “Replace the grey sofa with a mustard one” is a change. “Keep the rug, the window light and the cat exactly as they are” is a keep.
OpenAI’s help article adds a simple rule: if you want the edit to apply to a specific area, include that area in your prompt. Name positions in ordinary language, such as left of the doorway, behind the child in the red coat, or upper-right corner.
How to Select and Edit a Specific Part of an Image
OpenAI documents two ways to aim the ChatGPT Photo Editor at one region: use the selection tool and then describe the change, or skip the tool and describe the edit directly in the conversation. When you use the selection tool, the documented sequence runs like this:
- Select the image in your conversation or in Images to open the editor.
- Choose Select, then brush over the part you want to change. A slider adjusts the size of the selection tool, and Undo and Redo revise your selection.
- Choose Next, then describe the change in the conversation panel.
- Choose Save when you are finished. Cancel starts over, and an Aspect ratio control regenerates the image in a different shape.
OpenAI is candid about accuracy here: highlights are not always precise, and edits may extend beyond the area you selected. So write the target in words as well, and treat the brush as a hint instead of a fence.
One uncertainty deserves a flag. OpenAI’s editor instructions mention images generated by ChatGPT Images, while the same article says you can also upload an existing image. If Select does not appear on your uploaded original, a workaround I would try, which is my suggestion and not documented behavior, is to request the first edit in words. The version ChatGPT returns is a ChatGPT image you can then open in the editor.
What You Can Change With the ChatGPT Photo Editor
The list below describes common jobs and how to phrase them. None of these outcomes is guaranteed, and the quality of your original photo matters.
How to Change or Remove a Photo Background
For a new backdrop in the ChatGPT Photo Editor, name the setting, the light and the mood, then protect the subject: “keep the person, hair edge and clothing unchanged.” Hair, glasses and fur edges are the usual trouble spots.
For a see-through background, OpenAI’s Help Center says ChatGPT Images can follow instructions to make the background transparent. Preview the result against both a light and a dark surface before using it, because stray fringe pixels show up against contrast.
How to Add, Remove or Replace Objects
Removal works best when the thing is small and the background behind it is simple. Ask ChatGPT to fill the gap with whatever would plausibly be there. On the mobile app, OpenAI says the image controls for a generated image include Resize and Remove, so look for those before typing a long prompt.
For replacement, describe the new object’s size, material and position, and tell the tool to match the scene’s lighting. A sofa swapped in with the wrong shadow looks pasted, even when the sofa itself is perfect.
How to Improve Photo Lighting, Colors and Appearance
The ChatGPT Photo Editor responds best when you describe light the way a photographer would: its direction, softness and warmth. “Soft window light from the left, gentle shadows on the right cheek” gives the model more to work with than “make it prettier.” For color, state a direction and a limit: warmer, slightly richer greens, no neon skies.
How to Change Photo Styles and Create Creative Transformations
Style changes are where the ChatGPT Photo Editor feels most at home. You can ask for watercolor, comic ink, a vintage poster or a clay-model look while the composition stays recognizable. OpenAI says Images 2.5 is better at keeping subjects recognizable when it works from reference photos, though the company does not promise a perfect likeness. If portrait-style transformations interest you, our ChatGPT caricature guide shows how exaggeration and privacy choices play out in practice.
How to Use the ChatGPT Photo Editor for Portrait and Product Photos
Portraits call for restraint. Ask for cleaner lighting, tidier stray hairs and a quieter backdrop, and explicitly protect face shape, skin texture, age and expression. Heavy retouching can produce an image that no longer resembles the person, and it may mislead viewers on profile or dating pages.
Product photos have a different risk: invented detail. Ask ChatGPT to keep shape, color, label artwork and proportions identical, then compare against the real item. OpenAI’s announcement says templates now cover popular formats such as flyers and product photos, which is useful for layout starting points, but a sales listing should still show the product you actually ship.
How to Write Effective ChatGPT Photo Editor Prompts
Good prompts reduce retries in the ChatGPT Photo Editor. OpenAI’s Learn documentation advises describing what should change and what must stay the same, and adjusting one element at a time so the composition does not drift. Building on that, I use a four-part checklist, which is my own framework and not an official one:
- Target: the object, region or quality you want changed.
- Change: the result, described in concrete visual terms.
- Keep: everything that must survive, such as faces, crop, colors and text.
- Check: a final line asking ChatGPT to avoid new text, logos or extra objects.
If you want a deeper grounding in prompt craft beyond images, our ChatGPT prompts guide explains the task, context and output approach that applies to every kind of request.
Two more habits help. First, replace vague praise with specifics. “Beautiful lighting” means nothing, while “low golden sun from behind the subject” does. Second, when you attach several pictures, tell ChatGPT which is which, for example “image 1 is the photo to edit, image 2 is the color reference.”
Useful ChatGPT Photo Editor Prompt Examples
These ten ChatGPT Photo Editor prompts are original editorial examples. I have not run them for this guide, so results will vary between attempts, and you should expect to try a few variations. Replace anything in brackets. Check every output against your original.
1. Remove an Unwanted Object
Goal: erase one distraction without disturbing the scene.
“Edit the attached photo. Remove only the [blue recycling bin at the right edge]. Fill the space with what would naturally be behind it, matching the surrounding texture and light. Keep every person, the crop, the colors and all other objects exactly as they are. Add no text, watermark or new objects.”
Why it works: the word “only” and the closing exclusions limit the change.
2. Change a Background
Goal: move your subject into a new setting.
“Keep the person in the attached portrait unchanged, including face, hair outline, clothing and pose. Replace the background with [a softly blurred street at golden hour]. Make the hair edge look natural and match the light on the person to the new scene.”
Why it works: it names what is protected before naming what changes.
3. Improve Lighting
Goal: rescue a dim indoor shot.
“Relight the attached indoor photo as if a large window were on the left. Lift the shadows gently without making the image flat or glowing. Keep faces, expressions, clothing colors, furniture and framing identical, and avoid halo effects around edges.”
Why it works: it specifies direction and a failure mode to avoid.
4. Make a Portrait Look Professionally Photographed
Goal: tidy a headshot for a work profile.
“Retouch the attached headshot for a professional profile. Even out the lighting, tame flyaway hairs and soften distracting background detail. Do not change my face shape, skin texture, age, eye color or expression. Keep the skin natural, not smoothed, and keep the vertical framing.”
Why it works: identity features are listed, which limits cosmetic drift.
5. Adjust Colors and Contrast
Goal: a warmer, punchier landscape.
“Adjust the attached landscape to be slightly warmer with moderately higher contrast and richer greens. Preserve detail in the sky, avoid oversaturation, and do not change the composition or add objects.”
Why it works: each adjective carries a ceiling, so you get a direction without a cartoon.
6. Restore an Old Photograph
Goal: repair a scanned family picture.
“Restore the attached scanned photograph by reducing scratches, creases and dust, and gently improving contrast. Keep it black and white. Keep every person’s face, clothing and pose as in the original, and do not invent detail in heavily damaged areas; leave those softly neutral.”
Why it works: it tells the model not to guess at lost detail. Compare faces carefully, because restoration can quietly redraw people.
7. Create a Product-Photo Background
Goal: a clean shelf scene for a small product.
“Place the product from the attached photo on [a pale oak shelf beside a window with soft, diffused light]. Keep the product’s shape, color, label artwork, logo and proportions exactly the same, and add a believable soft shadow beneath it. Add no other branded items or text.”
Why it works: label and logo fidelity are named, and these are the details most likely to drift.
8. Change an Image’s Artistic Style
Goal: a painted version of a snapshot.
“Turn the attached photo into a soft watercolor illustration. Keep the composition, the number of people, their poses and the main objects in the same positions. Use a muted palette with visible paper texture, and include no text.”
Why it works: the composition is locked while only the rendering changes.
9. Edit One Specific Area While Preserving the Rest
Goal: swap a single object.
“In the attached photo, change only the [mug on the table, center-left] into [a small ceramic vase with three white tulips]. People, table, window, lighting, colors and crop must stay as in the original. Do not alter anything outside that object.”
Why it works: it pairs a precise location with a blanket “nothing else” instruction. Combine it with the Select tool when available.
10. Resize or Adapt a Composition
Goal: turn a vertical photo into a wide thumbnail.
“Adapt the attached image to a 16:9 landscape format. Keep the subject the same size relative to the frame’s height, extend the scene naturally on both sides instead of stretching, and leave the right third calm for text I will add later.”
Why it works: it forbids stretching and reserves space. OpenAI says you can also use the aspect ratio picker or state the ratio in your prompt.
ChatGPT Photo Editor for Beginners
If you have never edited anything, begin with a low-stakes photo, such as a snapshot of a pet or a plant, and make three small changes in one conversation: the background, the lighting, then a color shift. You will quickly learn how literal the tool is.
The most common beginner mistake with the ChatGPT Photo Editor is asking for five edits at once. Combined requests make it hard to know which instruction caused a problem. Another is judging the result on a phone screen alone; zoom in before you decide.
You do not need a paid plan to start. OpenAI’s free-plan FAQ says image generation has usage limits separate from text chat, and ChatGPT tells you when you reach one. If limits become the main obstacle, our comparison of ChatGPT subscriptions explains what each tier adds before you spend anything.
ChatGPT Photo Editing on Desktop and Mobile
OpenAI lists ChatGPT Images on web, iOS and Android, and the Images 2.5 announcement adds desktop. The workflows overlap, but a few details differ:
- Web and desktop: the editor with Select, Undo, Redo, Next, Cancel and Aspect ratio is documented here. Larger screens make fine selection and zoom inspection easier.
- Mobile: you open a generated image full-screen to edit it or add comments, and the image controls include Resize and Remove. Mobile is also where OpenAI says you can draw a sketch with @ and choose Sketch to guide a new image.
- Comments and canvases: OpenAI’s announcement says you can place comments directly on images. Its desktop documentation describes a Canvas view where comments can be sent with further instructions. Whether those appear for you depends on your surface and rollout.
My practical advice for the ChatGPT Photo Editor is to do selection-heavy work on a computer and quick, whole-image changes on your phone.
ChatGPT Photo Editor Features and Limitations
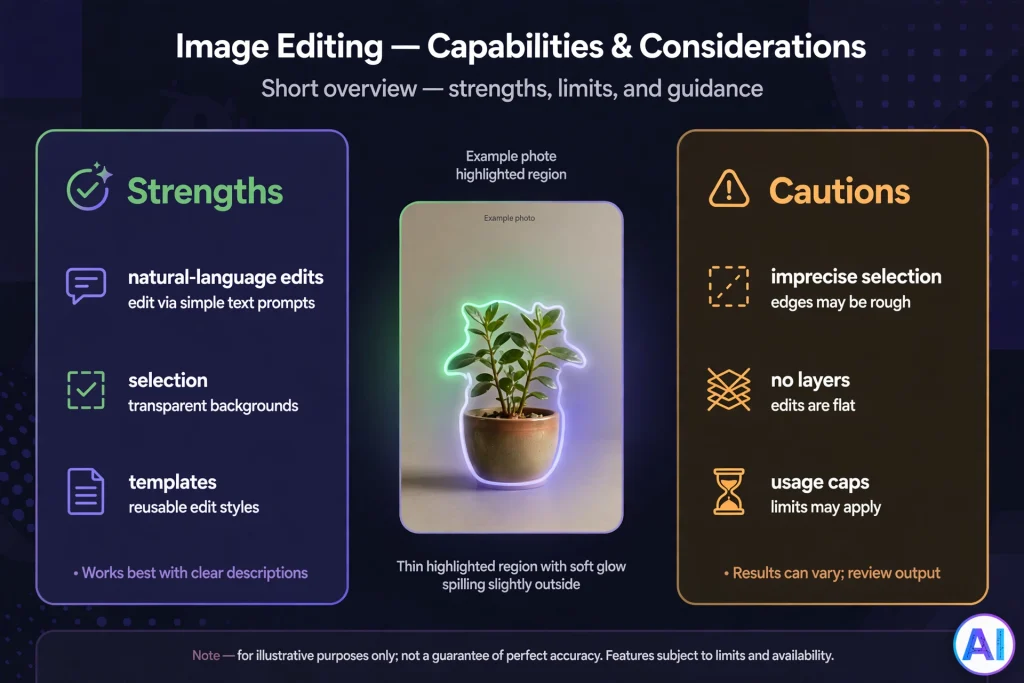
Documented strengths
- Natural-language edits to uploaded or generated images.
- A selection tool, aspect ratio control, Undo, Redo and Save.
- Transparent backgrounds when requested, plus a library of your creations under Images.
- Sketch, templates and comments introduced with Images 2.5.
- C2PA metadata and invisible watermarking on images made with OpenAI tools, which OpenAI says help identify them.
Limitations of the ChatGPT Photo Editor to plan around
- Imprecise selections. OpenAI says highlights are not always precise and edits may extend beyond the selected area.
- Not a layered editor. You cannot reopen a result as separate layers, so keep your original file.
- Usage caps. Image generation has separate limits from text chat, and OpenAI’s pages I reviewed give no fixed per-plan numbers. Treat any specific daily count you read elsewhere as unverified.
- Variable results. The same prompt can produce different images, and some attempts will miss.
- Output specifications. I did not find an official statement of exact output resolution or file size, so check the downloaded file if print size matters.
- Policy refusals. Some requests are declined under OpenAI’s usage policies.
ChatGPT Photo Editor vs Traditional Photo Editing Software
This comparison is editorial, not an OpenAI claim.
| Factor | ChatGPT Photo Editor | Traditional editor (layers, masks) |
|---|---|---|
| Learning curve | Low; you describe results | Higher; tools and terms to learn |
| Precision | Good for broad changes; boundaries can drift | Pixel-level control |
| Repeatability | Each attempt can differ | The same settings give the same result |
| Reversibility | Keep earlier versions yourself | Layers and history allow non-destructive work |
| Creative leaps | Strong, such as new styles or settings | Manual and slower |
| Evidence or product accuracy | Needs careful checking | Better when exact fidelity matters |
For many people the answer is both. Use the ChatGPT Photo Editor to explore ideas quickly, then move to traditional software for final measurements, exact text and print preparation.
Privacy and Safety Considerations When Uploading Photos
Before you upload anything to the ChatGPT Photo Editor, remember that photos reveal more than faces: street signs, house numbers, school logos and documents on desks. Crop what you do not need before uploading.
OpenAI’s Help Center explains the controls. For individual plans, content may be used to improve models when “Improve the model for everyone” is on, and you can turn it off under Settings and Data controls. Temporary chats are not used to improve models while they stay temporary, and they do not create memories. Business, Enterprise and Edu workspaces are not used for model improvement by default. One caveat: if you give a thumbs up or thumbs down, the associated conversation may be used even if you opted out.
Other safety habits matter just as much:
- Get permission before editing a photo of someone else, and use particular care with children’s pictures. OpenAI’s documentation also advises confirming you have permission to use a real person’s likeness.
- Do not upload identity documents or financial paperwork.
- To delete an image, OpenAI says you delete the conversation where it was created.
- Disclose AI edits where honesty matters, such as news, reviews or listings.
OpenAI also notes that teens may see a reminder before some image uploads, and that parents of linked teen accounts may control whether a teen can create or edit images.
Common Photo Editing Problems and How to Fix Them
Most trouble with the ChatGPT Photo Editor falls into a handful of patterns, and each has a practical response.
| Problem | Likely cause | What to try |
|---|---|---|
| The face looks different | The edit touched more than the target | Restate the keep clause; protect face shape, age and expression by name |
| Change spilled outside the selection | Highlights are imprecise | Name the area in words and add “do not alter anything else” |
| Hair or object edges look fuzzy | Complex edges against a new background | Ask for a cleaner edge, or use a simpler background |
| Colors drifted after many rounds | Repeated re-renders | Return to the original and apply the final intended edit in one clean pass |
| New text or logos appeared | The model added decoration | Add “no text, logos or watermarks” to the prompt |
| A limit message appeared | Usage cap on image creation | Wait for the reset ChatGPT shows, or consider a plan with larger allowances |
| The request was declined | Usage-policy refusal | Rephrase around your real purpose rather than disguising the request |
Tips for Getting More Accurate Editing Results
These habits improve ChatGPT Photo Editor results on almost every task.
- Start with the best original. A sharp, well-exposed file gives the model more to preserve.
- Keep a one-line edit log. Writing down each instruction tells you which change caused a regression.
- Compare at full zoom. Check eyes, hands, jewelry, text and edges.
- Use position words. Left, right, foreground and behind remove ambiguity.
- Repeat what must not change. The keep clause is cheap insurance.
- Branch, don’t pile on. If version three is good and version four is worse, go back to three.
- Finish important text elsewhere. Add exact wording in a design tool.
- Save finals locally. Download what you like so you do not depend on the conversation.
Conclusion
The ChatGPT Photo Editor is best understood as a conversation about a picture. You supply the original, state a change and a boundary, inspect what comes back, and adjust. It is fast, friendly to beginners and surprisingly flexible, yet it is not a pixel-exact tool, and OpenAI itself warns that selections can bleed.
Use the ChatGPT Photo Editor for backgrounds, lighting, style experiments and quick cleanups. Switch to traditional software when exactness, layers or legal accuracy matter. Whatever you choose, protect your privacy, keep your originals, and verify every result before you publish it.
Frequently Asked Questions
Can ChatGPT edit existing photos?
Yes. OpenAI’s Help Center says you can upload an existing image and describe the changes you want. The ChatGPT Photo Editor returns a new version, so compare it with your original.
Is ChatGPT Photo Editor free?
Partly. OpenAI says Images 2.5 is available across all ChatGPT tiers, but free accounts have separate image limits, and OpenAI does not publish a fixed number. Paid plans generally raise those limits.
How do I use ChatGPT to edit a photo?
Open the ChatGPT Photo Editor by attaching your photo in a new conversation, describe what to change and what to keep, review the result, refine one thing at a time, and save the final image.
Can ChatGPT remove a photo background?
The ChatGPT Photo Editor can attempt to replace or remove one on request, and OpenAI says it can follow instructions for a transparent background. Check hair and edges closely.
Can ChatGPT change a person’s clothes in a photo?
It is possible to ask for it as an edit, but results vary, some requests may be declined, and you should only edit photos of people with their permission.
Can ChatGPT edit only one part of an image?
Yes, in two ways: use the Select tool and then describe the change, or name the area in your prompt. OpenAI warns that edits may extend beyond a highlight.
Does ChatGPT Photo Editor work on mobile?
Yes. ChatGPT Images is available on iOS and Android, and OpenAI says mobile image controls include Resize and Remove. Larger screens are easier for fine selections.
Can ChatGPT improve blurry photos?
It may produce a cleaner-looking version, but OpenAI does not document a dedicated deblur tool. The model may invent detail, so do not use it for evidence, documents or identification.
What are the limitations of ChatGPT photo editing?
Selections are not exact, results differ between attempts, there are no layers, and usage caps apply. Accuracy-critical work still needs traditional tools and human checking.
Are uploaded photos private?
Privacy in the ChatGPT Photo Editor depends on your account and settings. Individual plans can contribute to model improvement unless you opt out, temporary chats are excluded while they remain temporary, and Business, Enterprise and Edu are not used by default.
Sources and References
Official OpenAI documentation
- OpenAI Help Center, “Images in ChatGPT”: https://help.openai.com/en/articles/11084440-images-in-chatgpt
- OpenAI Help Center, “ChatGPT Image Inputs FAQ”: https://help.openai.com/en/articles/8400551-chatgpt-image-inputs-faq
- OpenAI, “Introducing ChatGPT Images 2.5” (September 8, 2026): https://openai.com/index/introducing-chatgpt-images-2-5/
- OpenAI Learn, “Image generation”: https://learn.chatgpt.com/docs/image-generation
- OpenAI Help Center, “Using ChatGPT’s Free plan”: https://help.openai.com/en/articles/9275245-using-chatgpt-s-free-plan
- OpenAI Help Center, “How your data is used to improve model performance”: https://help.openai.com/en/articles/5722486-how-your-data-is-used-to-improve-model-performance
Other (non-official)
- AIVibesOfficial, “ChatGPT Image” guide: https://aivibesofficial.com/chatgpt-image/